PHOENIX Power Distribution Unit (ACGD and GRFD- OpenSpeed)
Prerequisites
This document covers PHOENIX Power Distribution Unit (PDU) (ACGD and GRFD- OpenSpeed)- Lockout and PHOENIX Power Distribution Unit (PDU) (ACGD and GRFD- OpenSpeed) - Restoring Power
1 PHOENIX Power Distribution Unit (PDU) (ACGD and GRFD- OpenSpeed)- Lockout
Procedure
- Power Down the computer subsystems.
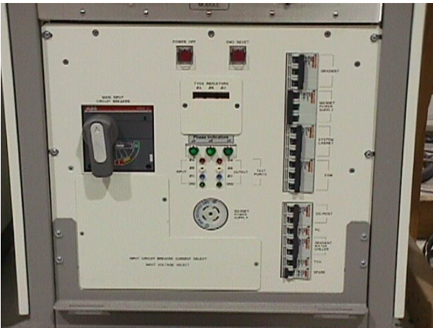
- Remove the cover from the front of the ACGD cabinet, OR if you are working
on an OpenSpeed HFO system remove the front cover of the GRFD to expose the
front of the PDU. See Figure 1
Figure 1. BREAKER LOCATION- PHOENIX PDU
- Power off the following two circuit breakers:
- Operators Workspace PC
- Operators Workspace Host
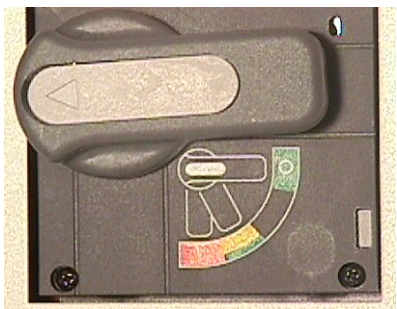
- Rotate the larger main breaker labeled INPUT counter-clockwise to the
green, OFF (O) position. See Illustration 8-7.
Figure 2. MAIN INPUT BREAKER IN THE OFF POSITION
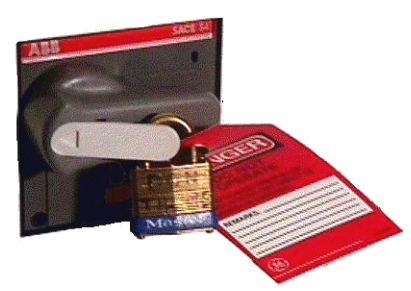
- Lock Out Tag Out the PDU “INPUT” circuit breaker.
- Press on the left-pointing arrow on the end of the handle to expose the location where the lock and tag can be placed.
- Lock and tag out the PDU “INPUT” circuit breaker as shown
in Figure 3
Figure 3. PDU MAIN INPUT CIRCUIT BREAKER LOCKED AND TAGGED OUT
2 PHOENIX Power Distribution Unit (PDU) (ACGD and GRFD- OpenSpeed) - Restoring Power
Procedure
- Remove the cover from the front of the ACGD or GRFD cabinet for the OpenSpeed system, to expose the front of the PDU.
- Remove the Lock and the Tag from the PDU “INPUT” circuit breaker.
- Rotate the larger main breaker labeled INPUT clockwise to the Red, 1 ONposition.
- Flip the circuit breaker for the Operators Workspace PC, ON.
- Flip the circuit breaker for the Operators Workspace Host, ON.
- Power on any other appropriate circuit breakers, you may have turned off.
- Boot Signa and log into scanning level
3 Finalization
Procedure
- Insure all subsystems have powered up successfully
- Do a test phantom scan to insure proper scanning