Installing Software Patches (General Guide)
Prerequisites
Overview
This document consist of the following:
1 Patch Load Procedure Overview
Procedure
- GO into Guided Install menu from Common Service Desktop (CSD) on the Service desktop. Click on Configure then Guided
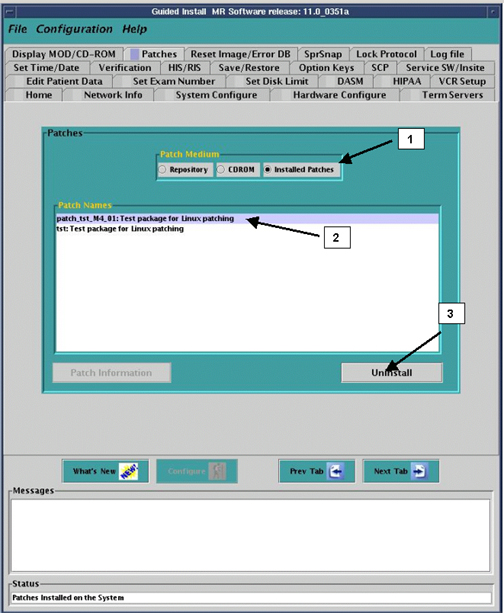
- Click on Patches Tab. See Figure 1.
Figure 1. Patches Tab Display

- From this GUI we can perform the following tasks:
- Determine patches that have been loaded onto the system disk by selecting Installed Patches option
- Determine patches that are on the CD-ROM by selecting CD-ROM option.
- Determine patches that have been downloaded to the /usr/g/insite/data via InSite by selecting Repository option.
- Help files can be viewed if available for patches on the system, CD-ROM, or in the /usr/g/insite/data directory by selecting the Patch Information
2 Patch Removal Process for old version
Procedure
- Click on Installed Patches section of GUI
- Click on the specific patch that you want to remove. The patch
will be highlighted.note:
There will be a installed service pack list in “Installed Patches” GUI, please removal them in order from the bottom one to top one.
- Click on Uninstall The patch will then
be removed. See .Figure 2
Figure 2. Removing Patches
- If there is a conflict which prevents a patch from being uninstalled,
the following message will appear. The conflict must be resolved
by possibly removing another patch
Figure 3. Uninstall Error Popup

3 Installing A Patch
Procedure
- There are 2 options for loading patches, load from Repository
or load from CDROM.
- To load a patch from Repository (located in /usr/g/insite/data), select Repository. The list of applicable patches that have been downloaded to the site via InSite will appear on the GUI.
- To load a patch from CD-ROM, insert the Patch CD into the drive on the Linux PC. Select CD-ROM. The list of applicable patches that are on the CD will appear on the GUI.
- Click on the applicable patch that you want to load. The patch should be highlighted. See Figure 4.note:
You can only load one patch at a time.
Figure 4. Selecting and Installing Patch
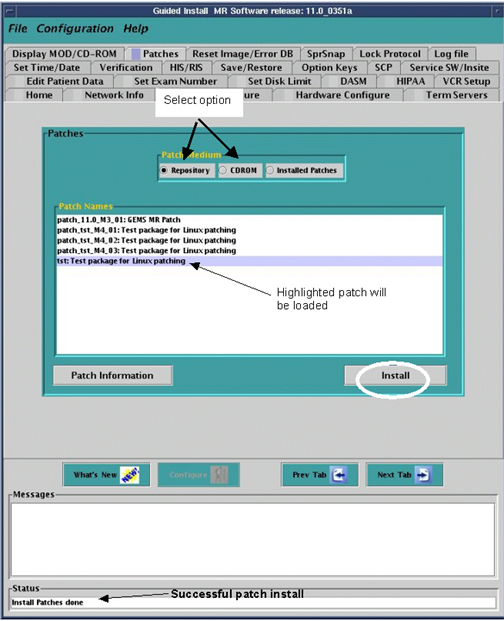
- To verify that the patch properly loaded, click in Installed patches. The patch, if properly loaded will now appear. Also look at the Status section of the Guided Install GUI. A message indicating Patch Load done indicates successful load.
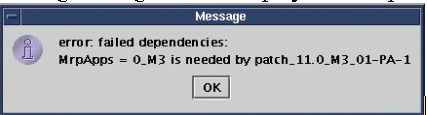
- The Patch will verify proper software revision and conflict
information before loading. If the software revision of the patch
does not match the Applications revision, the following message will
be displayed. The patch cannot be loaded.
Figure 5. Failed Dependencies Message
- If there are conflicts between patches on the system, and patches
to be loaded, the following message will be displayed.
Patch_tst_M4_01 = PA conflicts with patch_tst_M4_03-PA-1
This means that patch M4_01 (which is loaded on the system) must be deleted before you can load patch M4_03. See next section for patch removal, Patch Removal Process.
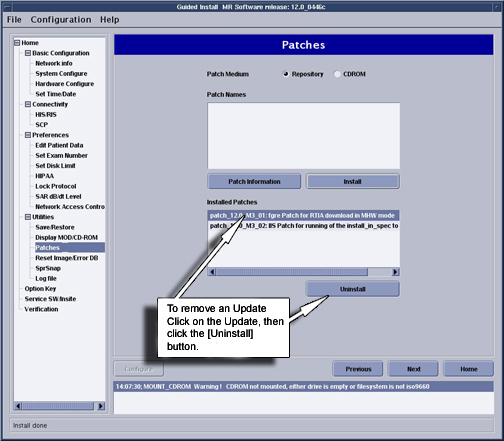
4 Patch Removal Process
Procedure
- Click on Installed Patches section of GUI
- Click on the specific patch that you want to remove. The patch
will be highlighted.note:
There will be a installed service pack list in “Installed Patches” GUI, please removal them in order from the bottom one to top one.
- Click on Uninstall. The patch will then be removed. See Figure 6.
Figure 6. Removing Patches
- If there is a conflict which prevents a patch from being uninstalled,
the following message will appear. The conflict must be resolved
by possibly removing another patch.
Figure 7. Uninstall Error Popup
5 Finalization
Procedure
- Do a “Good bye” scan to insure proper scanner operation.
- Cleanup any material that was used during the Patch operations.