Image Extraction
Prerequisites
1 Starting the Image Extraction Tool
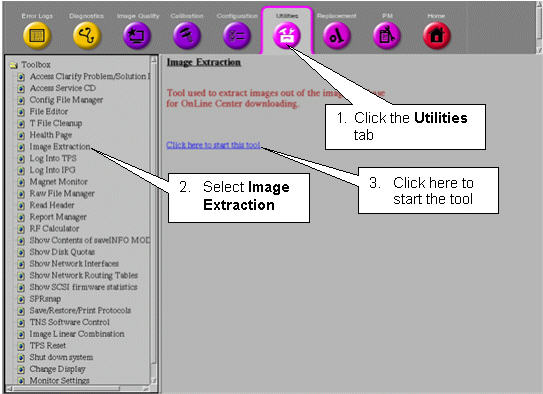
This document describes the procedure for extracting images from the image database for OnLine Center downloading.
Procedure
- In the Service Desktop Manager, click on the Service Browser button.
- Follow the instructions on Figure 1,
below.
Figure 1. Starting the Image Extraction Tool
- In the winterm window, you’ll be prompted to type the InSite password.
Type 2getin (in either upper- or lowercase), then press Enter.
Note that the password will not appear on the screen as you type.
The Main Menu appears in a winterm window. Refer to Figure 2.
Figure 2. Image Extraction Main Menu
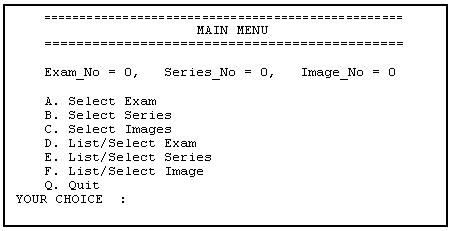
Main Menu options allow you to enter Exam, Series and Image numbers if you know them, or, if you’re not certain about the numbers, you can select them from a list.
-
If you know the number of the Exam, Series and Image you want to view, follow the Selecting an Exam, Series and Image(s) by Number procedure in Selecting an Exam, Series and Image(s) by Number
-
If you’re not sure of the numbers, but can identify the Exam, Series and Image by details or descriptions stored in the database, follow the Selecting an Exam, Series or Image from a List procedure in Selecting an Exam, Series or Image from a List.
note:Regardless of the extraction method you use, you can still select an Exam, Series or Image(s) from a list if any of the numbers you enter are not in the database. You must select the items in this order: Exam, then Series, then Image(s).
-
2 Navigating the Menus
Below are some navigational aids.
Procedure
- To make selections from the menus, the pointer must be within the winterm window.
- Only ten items (exams, series or images) can be displayed at once.
To display the next ten items, use the navigational keys at the bottom of
the screen:
Figure 3. Navigational Keys

- If you’re in a submenu (e.g., the Series menu) and you want to return to the previous menu, type Q at the prompt and press Enter.
- If you’re at the Main Menu, type Q to return to the Service Browser.
3 Selecting an Exam, Series and Image(s) by Number
Use this procedure if you know the exam, series and image numbers you’re looking for. If you enter a number that doesn’t exist in the database, the system will display a menu of all entries from which to choose.
Procedure
- To select an exam by number, on the Main Menu, type A (in upper- or lowercase) and press Enter.
- At the prompt Exam No. ?, type the exam number you
want to view. Press Enter.
- If you typed an existing exam number, the Main Menu will reappear. Go to step 3.
- If you typed an exam number that doesn’t exist in the database,
the Exam Menu will appear, from which you can select an Entry number. See
the example in Figure 4.
Figure 4. Exam Menu
- On the Exam menu, type the Entry number (not the exam number) preceding the desired exam, then press Enter. When the Main Menu reappears, go to step 3.
- To select a series by number, on the Main Menu, type B and press Enter.
- At the prompt Series No. ?, type the series number
(in the previously-selected exam) that you want to view. Press Enter.
- If you typed an existing series number, the Main Menu will reappear. Go to step 5.
- If you typed a series number that doesn’t exist in the database,
the Series menu will appear, from which you can select an Entry number. See
the example in Figure 5.
Figure 5. Series Menu
- Type the Entry number (in the first column) that precedes the series you’d like to view, then press Enter. Go to step 5.
- To select an image or images by number, on the Main Menu, type C and
press Enter.
- When the prompt Image No ? appears, you’ll
also see this message:
Type in the start image number and end image you want to copy with a space in between.
- To select more than one image, you can enter a range of images separated
by a space.
For example, to select images 81, 82, 83 and 84, enter 81 84. To select a single image (e.g., image 7), type 7 7.
note:A range of images must be consecutive (for example, 1 to 10, or 256 to 300). You can only select a range of image numbers from option C. Select Images. If you select option F. List/Select Image, you’ll have to choose the images one at a time.
- If you typed an existing image number (or range of numbers), go to step 6.
- If you typed an image number or range that doesn’t exist in the
database, the Image Menu will appear, from which you can select an Entry number.
See the example in Figure 6.
Figure 6. Image Menu
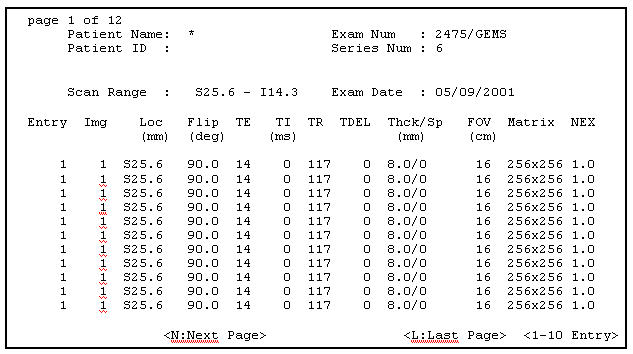
If you want to select a range of images, you won’t be able to do it from this menu; you can only select a range from the Image No.? prompt.
Instead, make note of the existing image numbers, then return to the Main Menu (by typing Q at the Entry prompt) until the Main Menu reappears. Select C Select Images, then press Enter. Finally, type the correct range (e.g. 14 19) and press Enter.
- When the prompt Image No ? appears, you’ll
also see this message:
- After you’ve selected an image or a range of images, a message
similar to this will appear:
The image file will be copied to /usr/g/insite/bin/gzip/e50022s1i8
It will then be compressed with /usr/g/insite/bin/gzip
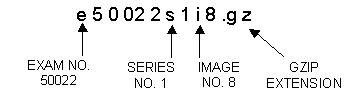
The compressed image file is then copied to the directory /usr/g/insite/tmp. Below is the system naming convention for extracted images.
Figure 7. Naming Convention for Extracted Images
- If the image(s) you selected already exist(s) in the /usr/g/insite/tmp
directory, you’ll see a message like this:
Gzip: /usr/g/insite/tmp/e50022s1i8.gz already exists; do you wish to overwrite (y or n)?
Type y to overwrite the existing image or n to cancel the overwrite.
- If the list contains more than ten items, use the navigational keys
at the bottom of the screen to move between “pages.” See Figure 3.note:
The tmp directory will be purged periodically, so if you need to view an extracted image that’s been in the tmp directory for a few days, you may have to re-extract it.
4 Selecting an Exam, Series or Image from a List
If you’d prefer to select the exam, series or image from a list of all entries in the database, follow the procedure below.
Procedure
- To select an exam from a list, on the Main Menu, type D (in
upper- or lowercase) and press Enter. Refer to Figure 2.note:
The Exam_No, Series_No and Image_No at the top of the menu display the numbers of the currently selected items. A zero (0) indicates that there is no current selection for that item.
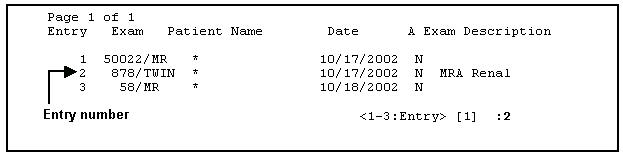
- A list of the exams in the database is displayed, as shown in Figure 8.
Figure 8. Exams in the Database
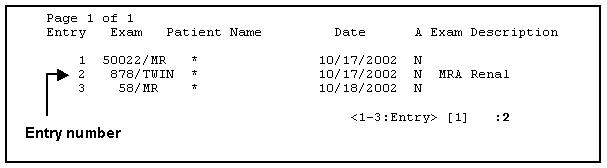
- Each Exam number is preceded by an Entry number. At the prompt, enter the Entry number preceding the exam you’re looking for (not the number of the exam itself). Then press Enter.
- If the list contains more than 10 items, use the navigational keys at
the bottom of the screen to move between “pages:” See Figure 3.
Be sure the pointer is within the winterm window, then type the letter N to go to the next page, P to go to the prior page, etc.
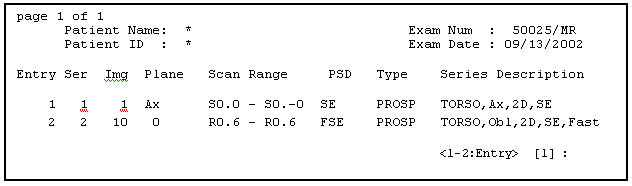
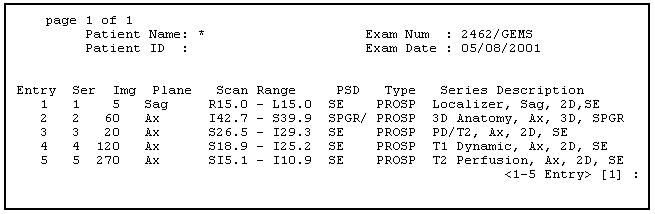
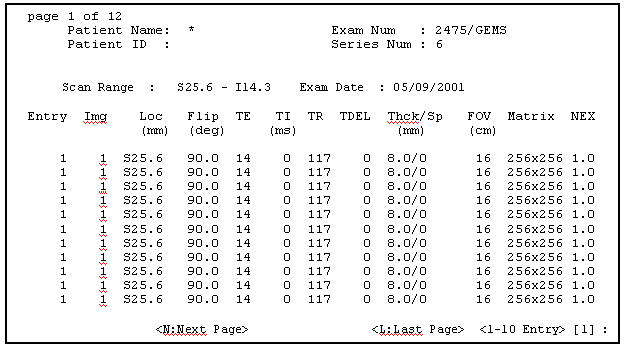
- When the Series Menu appears, select the Entry number of the series
(the second column, labeled Ser) you want to view. Then
press Enter. See Figure 9.
Figure 9. Series Menu
 note:
note:When a menu of images is displayed (see Figure 10), you cannot choose a range of images (for example, 5 10). You can only select them one at a time from the Image menu. See step 9, below, for details on selecting a range.
- When the Image Menu appears, type the Entry number of the image you
want to view. Press Enter. See Illustration
10.
Figure 10. Image Menu
- If there are multiple “pages” of images, go to the next
page by positioning the pointer anywhere in the winterm window, then type N and
press Enter.
Other navigational keys, displayed below the menu, will allow you to move forward, backward, to the beginning and end of the list of images. See Figure 3.
- To select a single image, type the number in the Entry column that precedes
the image you want. Press Enter.
A message similar to this one will appear:
The image file will be copied to /usr/g/insite/bin/gzip/e58s1i2
It will then be compressed with /usr/g/insite/bin/gzip
If the image already exists in the /usr/g/insite/tmp directory, you’ll see a message like this:
Gzip: /usr/g/insite/tmp/e50022slil.gz already exists; do you wish to overwrite (y or n)?
If you want to overwrite the existing file, type Y; if not, type N. Press Enter.
- To select a consecutive range of images:
- Return to the Main Menu by typing Q at the Entry prompts.
- At the Main Menu, type C (Select Images).
The prompt Image No ? appears with this message:
Type in the start image number and end image you want to copy with a space in between.
- Type the first image number and the last image number, separated by
a space.
For example, to select images 81, 82, 83 and 84, enter 81 84. To select a single image (e.g., image 7), type 7 7.
The message below will be repeated for each image you selected. The filenames are composed of the exam, series and image numbers. This message appears:
The image file will be copied to /usr/g/insite/tmp/e58s1i3
It will then be compressed with /usr/g/insite/bin/gzip
note:The tmp directory will be purged periodically, so if you need to view an extracted image that’s been in the tmp directory for a few days, you may have to re-extract it.
5 Exiting the Image Extraction Tool
Procedure
- If necessary, type Q at the current menu (Exam, Series or Image) and press Enter until you return to the Main Menu.
- At the Main Menu, type Q and press Enterto return to the Service Browser.
6 Finalization
Procedure
- No finalization steps.