MR Magnet and PET/MR Safety Requirements
1 Before Working in the Magnet Room with a Ramped Magnet
Prior to starting any service procedure in the magnet room perform the MRU user weekly test as described in the appropriate MRU Manual for your system. This test must be repeated every 7 days until the work is completed. If the test fails:
-
Identify one or more alternative methods for emergency magnet rampdown. Ensure you fully understand how to perform the emergency magnet rampdown procedure and the tools or access required. Each method must be easily accessible for quick execution in the event of an emergency. See Emergency Magnet Rampdown or the Magnet and Cryogen manual for your system magnet.
-
Immediately repair the MRU. If repairs are delayed, inform the customer that “GEHC strongly recommends that you stop using the system until the MRU repair is complete.”
-
Do not service any ferrous components in the scan room until the MRU is repaired (except for the MRU).
-
Note in the service record a hazardous situation exists at the site. Include who you spoke to, date, and time, what was communicated, and if the customer continues to use the scanner with a faulty MRU.
-
Escalate to your manager if the customer refuses MRU repairs.
2 Safety Procedures for Servicing Highly Ferrous Devices
|

|
In the event that a ferrous object becomes attached to the magnet, contact your MR Regional Support Engineer for directions before attempting removal.
 |
|
This section introduces an explicit service policy when servicing highly ferrous devices in a magnetic field. Devices such as B0 quench boxes, docks, longitudinal drive motors, blowers, passive shims, and coldheads are examples of highly ferrous devices that fall under this policy as follows:
For more information about highly ferrous materials, refer to Handling of Ferrous Material.
3 Magnet Safety
3.1 Magnet Safety Considerations
The Magnetic Resonance Imaging (MRI) System utilizes a magnet that can have a field strength several thousand times greater than that of the earth's magnetic field. The magnetic field surrounding the magnet is called the fringe field, and extends from the magnet's isocenter in all dimensions. The fringe field may present a hazard to persons and equipment within the surrounding area. Therefore, magnetic field precautions must be applied to the floors above and below the magnet, as well as to the surrounding space on the same level. To minimize the risk to persons and equipment when the magnet is at field, follow the precautions listed below.
If unsure whether an object is ferromagnetic (attracted to the magnet), use a small hand magnet to check the object before bringing it into the Magnet Room. If the device is ferromagnetic, follow the applicable service procedure for that device or contact local support with concerns.
Unless a specific responsibility is otherwise indicated, these statements apply to anyone accessing the system.
-
GE Task: Post Security Zone signs on both sides of any doors that lead into the Magnet Room to alert people of the high magnetic field and not to bring ferromagnetic objects into the Magnet Room. (See Figure 1and Figure 2.)
note:To determine the software revision, go to the Common Service Desktop > Home tab > Release Information.
-
(For DV23.0 and Earlier)
For 0.2T, 0.35T, 0.7T, 1.0T and 1.5T systems, use Magnetic Field Security Zone Sign (P/N 5116165) shown in Figure 3
-
(For DV23.0 and Earlier)
For 3.0T systems, use Magnetic Field Security Zone Sign P/N 5120663. (The 3.0T sign has “3.0T Magnet” in red lettering under the WARNING text at the top.) shown in Figure 4
-
(For DV23.1 and Later)
For 0.2T, 0.35T, 0.7T, 1.0T and 1.5T systems, use Magnetic Field Security Zone Sign (P/N 5458376) shown in Figure 5.
-
(For DV23.1 and Later)
For 3.0T systems, use Magnetic Field Security Zone Sign (P/N 5455191). The 3.0T sign has “3.0T Magnet” in red lettering under the WARNING text at the top. Magnetic Field Security Zone Sign shown in Figure 6.
-
For 7.0T systems, use P/N 2360019-2.
-
For 9.4T systems, use P/N 2360019-3.
-
(For DV23.0 and Earlier)
-
Customer Task: Post WARNING signs (which is supplied with the system and not a FRU) outside the 5-Gauss zone alerting persons with cardiac pacemakers, neurostimulators, and other biostimulation devices of the effect of the magnetic field on these devices. (See Figure 7for the system version DV23.0 and earlier sign Figure 8for the system version DV23.1 and later sign.) Post these signs two days prior to the activation of the magnet for maximum impact.
note:Signs should be posted outside the 5-Gauss line alerting personnel of this requirement. Since the magnetic field is three dimensional, signs should also be posted on the floors above and below the Magnet Room in which the 5-Gauss line exists.
-
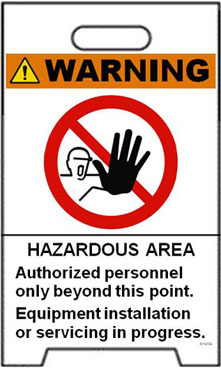
GE Task: Set up the AUTHORIZED PERSONNEL signs (P/N 5116158, supplied with the system and not a FRU) at the entrance(s) to the Magnet Room prior to the start of magnet service procedures. (See Figure 9.)
-
GE Task: Notify responsible personnel two days prior to the activation of the magnet to allow for preparatory actions to be accomplished.
-
GE Task: Do not bring ferromagnetic objects (including tools, pens, tape measures, and vacuum pumps) into the Magnet Room when the magnet is at field unless otherwise indicated in the GE Service Methods documentation.
-
GE Task: For active shield magnets, refer to the Pre-Installation Manual (PIM) for the 5,100, and 200 Gauss zones. For nonactive shield magnets (such as SIII and 7.0T), measure the Gauss levels in the surrounding area and make sure the 5, 100, and 200 Gauss zones for that site are specified in writing and left at the site in the same location along with a paper copy of the service safety manuals.
note:The PIMs can be found in the MR section of the website at the following link:
http://www.gehealthcare.com/company/docs/siteplanning.html#mr
-
Do not bring ferromagnetic objects within the 200 Gauss zone, and do not bring ferromagnetic objects on wheels within the 100 Gauss zone.
-
Use only nonmagnetic cylinders, nonmagnetic cylinder carts, and Dewars when transferring cryogens into an energized superconducting magnet.
-
Do not take self-winding watches, magnetically-coded credit cards, magnetic recording heads, magnetic tapes, or cameras near the magnet when it is at field.
-
Identify the magnetic field strength of the system before entering the Magnet Room to perform service procedures. For systems with a magnetic field strength of 3.0T and higher, the field strength is displayed on the security sign posted on the Magnet Room door.
-
Do not bring the nonmagnetic tool kit into the Magnet Room. The case has ferrous components that will result in being attracted to the magnet in field zones greater than 500 Gauss.
The local GE Field Service operation will provide the highly visible (orange, black, and white) security and warning signs in the primary local languages.
Figure 1. Security Sign on Outside of All Magnet Room Doors
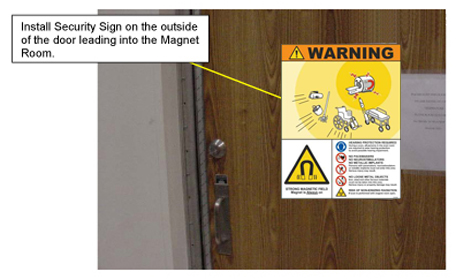
Figure 2. Security Sign on Inside of Magnet Room Doors that Open Outward
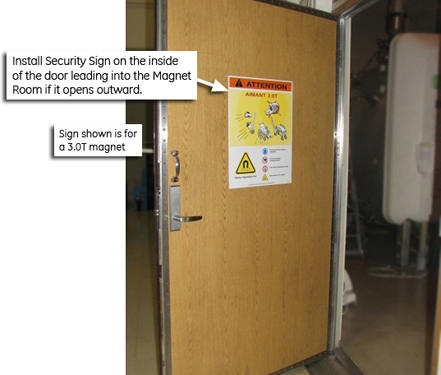
Figure 3. System DV23.0 and Earlier Magnetic Field Security Zone Sign (0.2T, 0.35T, 0.7T, 1.0T and 1.5T) P/N 5116165
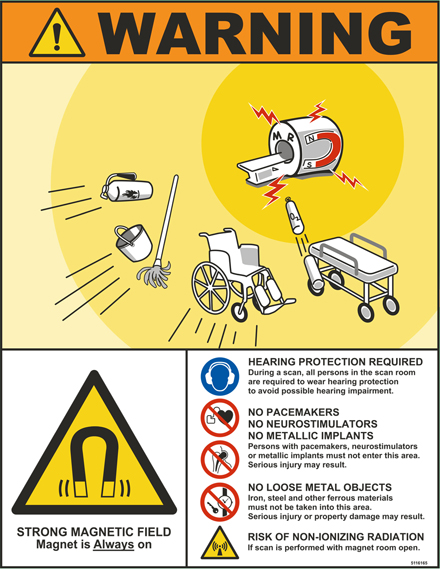
Figure 4. System DV23.0 and Earlier Magnetic Field Security Zone Sign (3.0T) P/N 5120663
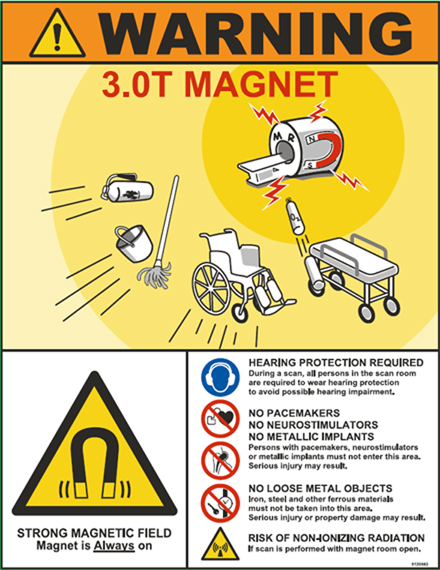
Figure 5. System DV23.1 and Later Magnetic Field Security Zone Sign (0.2T, 0.35T, 0.7T, 1.0T and 1.5T) P/N 5458376
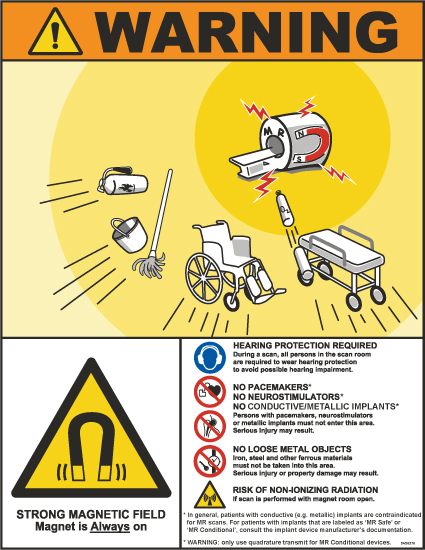
Figure 6. System DV23.1 and Later Magnetic Field Security Zone Sign (3.0T) 5455191
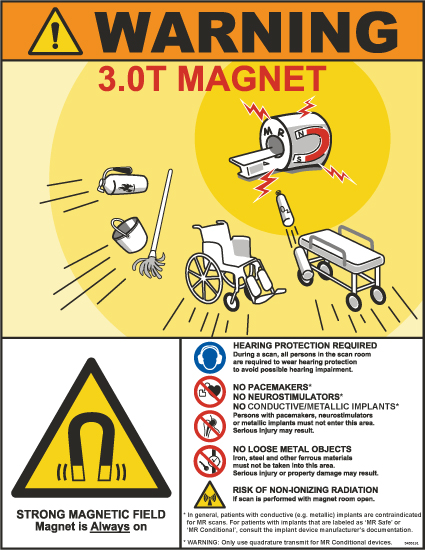
Figure 7. System 23.0 and Earlier Magnet Field Exclusion Zone Warning Sign (P/N 5116163)
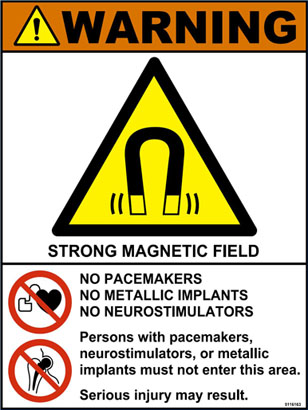
Figure 8. System DV23.1 and Later Magnet Field Exclusion Zone Warning Sign (P/N 5457590)
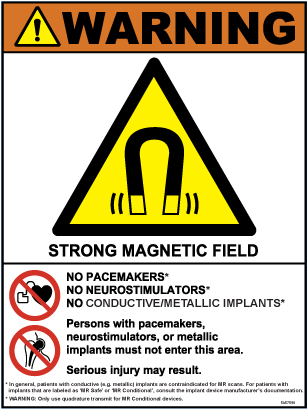
Figure 9. Authorized Personnel Sign (5116158)
3.2 Emergency Situations
The magnet technology used on MR Systems may vary from one product design to another. There are three basic magnet technologies used by suppliers today: 1) Superconducting Magnets, 2) Permanent Magnets, and 3) Resistive Magnets.
Each magnet technology will have emergency response processes unique to that design. For example, If a person is pinned to the magnet by a ferromagnetic object or that object has become attached to the magnet, the magnet technology will dictate the appropriate action to be taken. Refer to the appropriate Magnet section in this document and First Aid/Emergency Situationsfor specific actions. This document addresses designs relating to Superconducting Magnets.
4 Superconducting Magnets
4.1 Introduction
Superconducting magnets contain cryogenic liquids (liquid helium = 4 kelvin (-452° F, -269° C); liquid nitrogen = 77 kelvin (-321° F, -196° C) and generate a strong three-dimensional magnetic field. These conditions require safety precautions to be taken to prevent serious injury (cryogenic burns, asphyxiation, explosion, fire, shock, ferromagnetic projectiles, or other magnetic field effects). The safety precautions/requirements contained in the following sections must be reviewed, understood, and implemented prior to performing any service on a superconducting magnet. Make sure that all magnet service is performed by trained and authorized personnel and all safety equipment is in place.
All persons working with cryogens and/or cryogenic liquids should understand the following:
-
Nature and properties of liquid and gaseous helium and nitrogen
-
Specific instructions on the equipment
-
Use and care of protective equipment and protective clothing
-
Safety and first aid
-
Handling emergency situations such as leaks, spills, and fires
4.2 Cryogen Safety Requirements
4.2.1 Site Precautions
The Field Service Engineer is responsible to ensure the following items are in compliance:
-
Review all service processes to be performed on the magnet with the facility Safety Officer or with local authorities (i.e., fire department, safety council, etc.) and obtain any required permits prior to magnet commissioning and servicing.
-
LHe will also transform into a gaseous phase if a vacuum break occurs. When this happens, the normal room temperature in the vacuum space will cause the liquid helium to quickly boil away and must be vented out of the building. Never connect a magnet to an uncompleted vent. If a vent line has a failure, do not perform any service operations on the magnet or system.
-
There are two types of venting required in the magnet room: Magnet Room Venting and Cryogen Venting.
-
Magnet Room Venting:
-
Ensure Magnet Room venting has been installed, tested, and operating in conformance with pre-installation manual requirements.
-
Check that there are provisions for exhausting the gas through the magnet vent system for any service action that releases large quantities of cryogenic gas.
-
-
Cryogen Venting:
-
Ensure the magnet is vented in conformance with the pre-installation manual requirements. Magnet plumbing and the vent system shall be inspected for leaks during magnet installation.
-
During nitrogen pre-cool (if applicable to the on-site magnet), use a portable floor fan and exhaust duct to keep fresh air circulating throughout the room. This is necessary because too much nitrogen can displace oxygen.
-
Secure the door into the Magnet Room in the open position prior to any service action that will result in the handling or release of cryogens from the magnet. Secure the ceiling hatch and rear door in the open position if in a mobile van.
-
Make sure a second person (GE employee or contractor trained in these safety requirements) is present in the area during magnet service in case of emergency.
-
Make sure a fully functional land-line telephone (with emergency response numbers clearly posted beside it) is available in a known and immediately accessible location near the Magnet Room.
-
Set up “Authorized Personnel Only” signs outside the Magnet Room door(s) prior to any magnet servicing.
-
Make sure your personal oxygen monitor is calibrated and operating properly before beginning any magnet service.
-
Always maintain a clear exit path. If a Dewar is to be used in the Magnet Room, the path must be wide enough to accommodate the Dewar.
-
-
4.2.2 Equipment Handling Precautions
-
Do not bring any ferromagnetic equipment, Dewars or cylinders into the Magnet Room when the magnet is ramped. They will become dangerous projectiles in the presence of the magnetic field.
-
Do not bring any boxes into the Magnet Room without first checking them for ferromagnetic components.
-
Gas cylinders are pressurized to ~2,400 psi. Secure each gas cylinder before removing the protective cap, and open the main valve very slowly to prevent any possibility of a fatal release of explosive gas. Make sure gas cylinders are stored in an upright secured position.
-
Firmly hold the unattached end of the gas hose during a purge to prevent the hose’s “whipping“ motion.
-
Keep Dewars in the vertical position at all times. Dewars should have wheels mounted at the base for transport. If wheels are not present, use a low platform dolly that fully encompasses the Dewar’s base for moving. Do not slide or roll Dewars. Use a nonferrous hand truck to move gas cylinders. Use a small hand magnet to check the dolly or hand truck to ensure it will not be pulled into the magnet before bringing it into the Magnet Room.
-
Make sure the transportation route for Dewars and gas cylinders is clear of obstacles and restrictions.
-
Check Dewars for high pressure, and follow documented service procedures for reducing pressure prior to use.
-
Check all equipment, Dewars, and gas cylinders for leaks.
-
Make sure that safety relief valves and regulators are operating properly.
-
Store Dewars in a well-ventilated area as outlined in the room ventilation pre-installation manual.
4.2.3 Cryogen Handling Precautions
-
Contact of liquid cryogens or their vapors with the eyes can cause severe frostbite, even when contact is too brief to affect the skin. Always wear safety glasses and a face shield when handling cryogens.
-
Protective clothing (long sleeve shirt, long pants, protective apron/jacket), cryogen gloves, and face/eye protection (face shield and safety glasses) shall be worn when handling or being exposed to cryogens to prevent cold burns resulting from contact with the cryogenic liquid or gas.
-
Personal oxygen monitors must be worn at all times when handling cryogens.
note:You can download the operator’s manual for the oxygen monitor (MSA ALTAIR Pro O2 Monitor Operator Manual) from the Service EHS SupportCentral community.
-
Make sure a calibrated, functioning oxygen monitor (if present) is installed in the Magnet Room in conformance with site requirements in the Magnet Room and cryogen storage area. The position of the O2 monitor sensor should be at a level that corresponds to the cryogen product being stored or dispensed (for liquid helium, the sensor should be near the ceiling; for liquid nitrogen, the sensor should be near the floor).
-
If the alarm mode of the oxygen monitor (if present) is activated, immediately evacuate the room. Determine the cause and if ventilation is a problem, correct the situation.
-
Be sure that the oxygen monitor (if present) is reading a safe level before entering the affected area to continue with service procedures.
-
-
Smoking is prohibited in the Magnet Room and around cryogens. The extreme low temperatures of liquid helium and nitrogen cause oxygen from the air to liquefy on cold surfaces (for example, on the transfer tubes). This produces a highly enriched oxygen liquid. For this reason, grease or oil lubricants must not be used on hose pipes, regulators, and so on. The highly enriched oxygen environment can cause these kinds of lubricants to ignite easily.
-
When pluming a stinger, always point the stinger toward the ceiling and away from the face at a 45-degree angle.
-
Do not bring more than 1,000 liters or two Dewars (whichever is less) of cryogens into the Magnet Room.
-
Do not bring nitrogen and helium Dewars into the Magnet Room at the same time.
4.2.4 Magnet Service Precautions
-
Ramp the magnet down to Zero field prior to any service requiring opening/exposure to the helium vessel and/or cryogenic gas/liquid, except as directed in a service procedure. This prevents the possibility of a magnet quench and rapid expulsion of cryogenic helium gas and liquid.
-
Make sure nonferromagnetic fiber or composite safety shoes are worn in the Magnet Room.
-
Observe the helium vessel pressure gauge and vent the magnet down to less than 0.5 psi before removing ramp/fill port caps or loosening a component, resulting in the release of cryogenic helium gas and liquid.
-
Never allow a helium Dewar to empty during a magnet fill, resulting in a magnet quench from the introduction of warm helium gas.
-
Wear proper Personal Protective Equipment (PPE).
-
Use the appropriate service procedure, and exercise caution when inserting ramp leads or a shim lead into a ramped magnet to prevent a quench.
-
Avoid rapid head and eye movements when working near or inside the magnet bore to minimize dizziness.
-
Always have a second MR safety-trained person available when:
-
specified by service instructions,
-
handling highly ferrous parts, and
-
performing work near or inside the magnet bore.
-
-
Never allow yourself to be positioned between the magnet and any unknown objects that may be brought into the Magnet Room.
-
Limit the access into the Magnet Room before performing service in the room. This can be achieved by installing a Yellow and Black Caution Tape across the door opening and placing the “Authorized Personnel” sign below it.
-
Identify the type of magnet and its field strength before performing service in the Magnet Room. The Security signs are installed on the entrance doors into the Magnet Room. These signs indicate the field strength of magnets greater than 1.5T inside the room.
-
Use caution when using ferrous tools as they are attracted to the magnet at fields over 500 Gauss.
-
Do not bring the nonmagnetic tool kit into the Magnet Room. It will become attracted to the magnet if exposed to a field greater than 500 Gauss.
4.2.5 First Aid/Emergency Situations
4.3 Magnet Field Safety Requirements
4.3.1 Site Precautions
In addition to all considerations listed in Magnet Safety Considerations, make sure the following precautions are followed to minimize risk to personnel resulting from the magnetic fringe field:
-
Post the AUTHORIZED PERSONNEL warning sign (P/N 5116158) at the Magnet Room entrance prior to ramping the magnet.
-
Prior to ramping the magnet, ensure all ferromagnetic material (such as the blower box) is either properly installed as a part of the magnetic resonance system OR completely removed from the Magnet Room. Confirm that the room construction does not contain ferrous material.
-
Prior to ramping the magnet, make sure that the Magnet Rundown Unit (MRU) is operating properly. See the latest revision of the Magnet Rundown manual, PN 5265188, available from the online documentation library.
-
Do not loosen any ferromagnetic components on a ramped magnet unless specifically called for in the service documentation.
-
Wear cryogen gloves when opening or closing the coldhead motor shield.
-
Use caution when opening or closing the top half of the coldhead motor shield. Never put your hand or fingers between the motor shield and mounting bracket.
4.3.2 Ramping Precautions
A superconducting magnet at field is a high-energy storage device capable of discharging rapidly (quenching), creating a high voltage across the main leads. Make sure the following precautions are observed when ramping a superconducting magnet:
-
When working with the main lead connections that are installed into a ramped magnet, do not touch both main lead extensions at the same time or allow them to come in contact with one another.
-
Allow main lead extensions to cool before fully inserting them into a ramped magnet to prevent any possibility of a quench.
-
Make sure the power supply has passed all functional checks, and the input power cable is disconnected before connecting it to the main power leads.
-
Make sure the final magnet “parking” current and voltage polarity have been recorded and will be available if a ramp-down is required. An incorrect polarity connection will result in a magnet quench.
-
Use the appropriate hold-down tool to properly secure ramp leads to the magnet.
4.3.3 Magnet Rundown Unit Installation and Use
-
Make sure the MRU was installed in conformance with the GE Magnet Service Manual, the batteries were charged for 24 hours, and the MRU passed the functional checks in conformance with the supplier manual before ramping the magnet. See the latest revision of the Magnet Rundown manual, PN 5265188, available from the online documentation library.
-
Make sure the rampdown methods covered in the in the GE Magnet Service Manual are fully understood by Field Service Engineers involved with the MR equipment.
-
Hospital personnel involved with the MR equipment should be familiar with the equipment Operator Manual and MRU operation.
4.4 Magnet and Cryogens Service Safety Requirements
4.5 Second Person Service Requirements
The second person is required on site whenever service is performed on the superconducting magnet subsystem. It is critical that this individual is always present to ensure everyone’s safety. It is more than just having a second person around while working. A second person is someone who will maintain communication at all times, and sound the alarm in case of an emergency, and may even assist in performing the service procedure if qualified.
All individuals selected to perform the task of a second person must comply with the prerequisite training. Refer to the itemized list below and Table 3for a list of responsibilities for the MR and PET safety-trained second person.
-
The second person can be an MR or PET Engineer, other GE employee, a contractor or a contracted employee. The Engineer and second person must review safety precautions and the service procedure to be performed prior to entering the MR or PET/MR Suite. The second person must be dedicated to the service task, and demonstrate MR and PET safety competency by reviewing:
-
(For those servicing an MR or PET/MR system) MR512 course and/or the SRA
-
(For only those servicing a PET/MR system) EHS-575 course
note:For GE Field Engineers (FEs), the Principles of MR Suite Safety course, GEHC-EHS-MR512-SAFETY and Radiation Safety Awareness course, GE-EHS-575 are accessed in MyLearning.
-
-
The Medical Considerations List (see Medical Considerations) must be completed. If the second person identifies issues on the list, those issues must be resolved before s/he performs service procedures.
-
The safety-trained second person must:
-
Know how to evacuate the area (emergency escape route) as demonstrated by the FE.
-
Review specific routes from the room, and understand the host site evacuation process.
-
Understand the fire protection, low oxygen and any other site safety systems and discuss appropriate response for each scenario.
-
-
Both the FE and safety-trained second person need to understand the capabilities of the host site Emergency Response Team, and review possible scenarios and preplan what to do and when based on the situation.
note:The safety-trained second person is not trained in rescue. His or her role is to summon trained personnel so that rescue can be performed.
-
Both the FE and safety-trained second person must wear a radiation dosimeter while servicing a PET/MR system.
-
Both the FE and safety-trained second person must review the shut down/emergency actions the safety-trained second person is authorized to perform based on the situation.
4.6 Medical Considerations
Before performing service procedures, anyone acting as an Second Person must read and consider the following conditions that may create physical hazards in high magnetic and radio frequency fields.
If you have answered “yes” to the following:
Dentures or partial plates or loose dental fillings:
Partial plates or removable bridges may have metal and must be removed prior to entry. Full dentures are likely to be all plastic or resin, but if not, must be removed prior to entry. Clarification from your dentist may be necessary.
Tattoo or permanent makeup:
Tattoos near the eyes or on the face are of special concern. The skin problems range from simple “tingling” to 1st and 2nd degree burns and pain. If you have tattoos you should be aware of the concerns and remove yourself from continued magnetic exposure if any symptoms (tingling, burning, pain, etc.) occur in the area of tattoos.
Body-piercing jewelry:
Must be removed if possible when going into magnetic field.
Hearing aid:
Must be removed prior to entry in magnetic field.