CD and DVD Functions
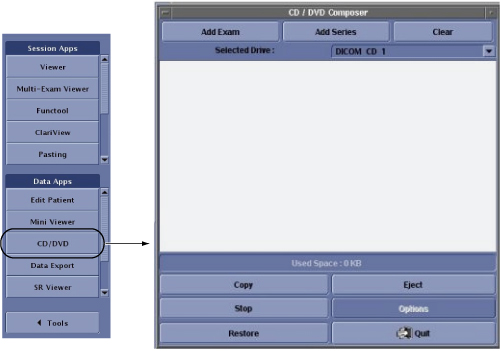
Figure 1. CD/DVD Composer Window on Image Desktop
1 Description
The CD/DVD allows you to store DICOM images and a CD Viewer to a CD-R or DVD-R media that can be played back on a PC or laptop with a Windows™ 2000 or XP operating system. Images stored on a CD-R or DVD-R can be restored to the AW system or MR EXCITE HD system.
The CD/DVD interchange system is not considered part of the archive system but rather an ancillary storage device designed for sending select images or an entire exam to referring physicians. When an exam/series/ image is burned to a CD-R or DVD-R, the system does not consider the exam/series/or image as archived. Therefore, the archive column on the Browser does not change its state based on CD/DVD interchange activity.
The system does not know if a CD-R or DVD-R is in the drive until the copy action begins. Therefore it is necessary to note the size of the files you are selecting so that you do not exceed the media capacity. The approximate maximum capacity for a CD-R is 500MB and the approximate maximum capacity for DVD-R is 4 GB. The cumulative file size to be copied is displayed in the message/progress bar area of the CD/DVD Composer (see Figure 1).
2 CD and DVD Media Considerations
-
A recordable CD (CD-R) or DVD-R can only be recorded once. All image data that you want to record on a given CD-R or DVD-R must be selected beforehand, and will be recorded in a single pass. It is not possible to add data on a CD-R or DVD-R.
-
When recording DICOM image data on a CD-R or DVD-R, you must always use a BLANK media.
-
Once you have started recording, click [Quit] to close the interface. The system continues to burn data to the CD/DVD in the background. To view the CD/DVD window, click [CD/DVD] from the Browser list of programs. Note that the list of items is blank. View the progress bar to note if the burning process is finished.
-
Image data can also be recorded on CD-R in PDF or HTML format, using the Data Export function.
-
Recordable CDs are considerably more sensitive to damage than the conventional CDROMs that you may be familiar with. Respect the handling instructions below.
 |
|
-
Store the disk in the protective case. Proper storage helps protect the data from damage due to scratches on the disk surface.
-
Do not leave the disk in direct sunlight or in a hot, humid environment. These conditions can warp and damage the disk.
-
Use only a felt tip permanent pen when labeling. Write only on the clear inner diameter of the disk (or the printed area of a CD-R). Never use a ballpoint or hard point writing tool as it may damage the disk. Do not use adhesive labels.
-
Use a soft, lint-free cloth to remove spots, dust, or fingerprints from the disk. Always wipe from the center to the outside edge of the disk. Never wipe the disk in a circular motion.
-
Do not use any chemical-based cleaners. These can damage the disk.
-
Do not use the CD/DVD program to permanently store your MR data. If the CD/DVD is scratched there is no recovery of the data.
3 Saving Images to CD-R or DVD-R
-
Place a CD-R or DVD-R in the CD/DVD drive. Wait until the CD/DVD drive light turns off, which is an indication that the CD-R or DVD-R is spinning up to speed.
-
Click CD/DVD from the Browser program list to display the CD/DVD Composer.
-
The CD/DVD Composer can be sized by left-clicking and dragging the corners or sides of the window.
-
The CD/DVD Composer can be moved by left-clicking and dragging the window title bar.
-
-
Select images from either exam level or series level.
-
If you need to save Images at the exam level, select the desired exams in the Browser.
-
To select contiguous exams, press Shift + the first and last exam in the Browser exam list.
-
To select non contiguous exams, press Ctrl + click each individual exam in the Browser exam list.
-
-
If you need to save Images at the series level, select the desired series in the Browser.
-
To select contiguous series, press Shift + the first and last series in the Browser exam list.
-
To select non contiguous series, press Ctrl + click each individual series in the Browser exam list.
-
-
-
From the CD/DVD Composer window, click Add Exam or Add Series according to your image selection.
-
The selected files are added to the CD/DVD Composer list. Click the + icon next to the exam or series list to see the exam or series contents.
-
The CD Composer prepares the data and updates the message bar with the cumulative file size as you add each selection. Do not exceed 500 megabytes for a CD-R or 4 gigabytes for a DVD-R.
-
To remove a series from the list, highlight the series and click Clear.
-
-
Click Copy and Yes to the confirmation prompt to start the recording process.
-
Do not begin recording until all desired series have been added to the list. You cannot record more data to the CD-R or DVD-R once you have started the recording process.
-
The message/progress bar displays messages and a progress bar indicating the progression of the copy activity.
-
Error prompts may appear if the media is damaged, if the media is not blank, the files are too large for a single media, etc.
-
The progress bar displays 100% when recording is completed.
-
-
When the contents have been burned to the media, click [OK] to the Record Completed Success prompt.
-
Click Eject to remove the media from the drive.
-
Once you have started recording, click [Quit] to close the interface.
-
The system continues to burn data to the CD/DVD in the background.
-
Stop is the only button that stops burning data.
-
-
To view the CD/DVD window, click CD/DVD from the Browser list of programs. Note that the list of items is blank. View the progress bar to note if the burning process is finished.
4 Restoring Images from CD-R or DVD-R
-
Load the CD-R or DVD-R into the media drive.
-
Click CD/DVD from the Browser program list to display the CD/DVD Composer.
-
Click Restore from the CD/DVD Composer.
-
Highlight the data you want to restore.
-
Click Local Disk from the CD/DVD Composer and Yes to the confirmation prompt.
-
The only indication that the restoration is taking place is an hour glass shaped cursor.
-
Click Stop to stop the restore process at any time while the system is restoring data. Any images already transferred will be located on the hard drive. If you repeat steps 1-5, the system only restores images that have not yet been transferred.
-
-
Click OK to the Restore Completed Success prompt.
This prompt is not seen if you close the Restore window before completion.
-
Click Quit to close the Restore window and then [Quit] to close the CD/DVD Composer.
5 Ejecting a CD-R or DVD-R from the Drive
Click Eject from the CD/DVD Composer. If a store or restore process is active, the CD/DVD drive is locked and the eject button on the drive is inactive.
6 CD Viewer
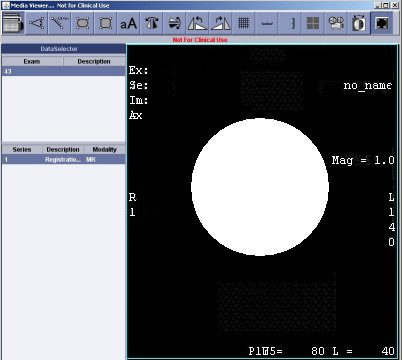
The CD DICOM Viewer is automatically loaded onto a CD-R or DVD-R that is burned from the CD/DVD program.
Figure 2. CD Viewer.
-
Load a recorded CD-R or DVD-R into the drive of your PC running Windows Internet Explorer 5.5 or greater.
-
CD Viewer automatically launches.
-
Click I Agree to the Disclaimer of Warranties; Limitations of Liabilities prompt.
-
Refer to the instructions that follow for details on the operation of CD Viewer, or click the ? icon.
6.1 Data Export
Figure 3. Data Export Window

Data Export allows you to either store or ftp MR images as JPEG, PNG, AVI, MPEG or MOV formats. The files can only be burned to a CD-R and only one report can be burned at a time. Once a CD-R has been burned, you cannot add more reports. In other words, it is a burn once process and not a re-writable process.
The JPEG, PNG, AVI, MPEG or MOV images can be viewed from a PC or laptop with a WindowsTM 2000 or XP operating system using Internet Explorer 5.5 or later.
There are two tabs on the Data Export window: Compose and Export. The Compose tab allows you to define the compression factor, annotation level, W/L, scroll, zoom, and output format for the series you want to export. The export tab is a list of all the exams and series you have in the Data Export program. This means that you can compose a series and then export it to either a CD or ftp site at a later date. Exams and series stay in the Export program until they are actively deleted.
6.1.1 Compose Tab
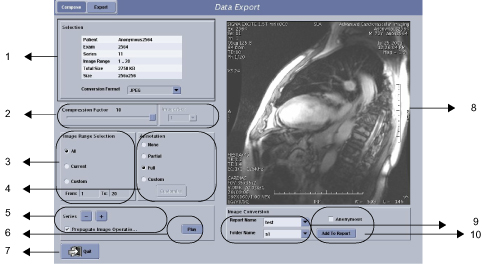
Figure 4. Compose Tab
6.1.2 Export Tab
|
|
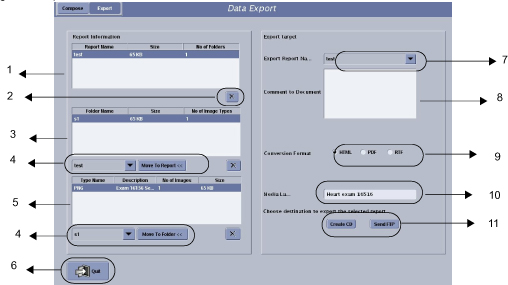
Figure 5. Export Tab
6.2 Compose a Report
-
From the Browser, highlight the series you want to export. Only one series can be exported at a time.
-
Click Data Export from the Browser program list.
-
The Compose tab should be selected, if not click Compose.
-
Review the images in the Compose viewport.
-
Middle-click and drag to adjust W/L.
-
Right-click and drag to adjust zoom factor.
-
Left-click and drag to scroll.
-
Press the Page Up or Page Down keys on the keyboard to navigate through the images.
-
Click Play to view the images in a cine loop.
-
-
Once you are satisfied with the image appearance (W/L, zoom, scroll), display the first image in the series and click Propagate Image Operations box.
-
Select the conversion format from the pull-down menu.
-
Select the desired image range. If you want a subset of the images, click the Custom radio button and type the range in the text box.
-
Select a compression factor.
The smaller the number, the higher the image quality and the larger the file size.
-
Select an Annotation option. If you want the patient name to be displayed as Anonymous with the exam number, click the Anonymous radio button.
-
Enter a name for both the report and the folder. Use no spaces or characters other than alpha numeric.
-
Click Add to Report.
If you change your mind and decide not to add the data to the report, click [Cancel] from the progress bar window.
-
Click Quit to exit the Data Export application.
-
To add another data set to the report, repeat the last 12 steps.
6.3 Export a Report
-
Click Data Export from the Browser list. If you are already in Data Export, click the Export tab.
-
Select the desired report from the Export Report Name pull-down menu.
-
Select the desired data set from the Type Name list.
-
Optional: type a message in the Comment text box. Do not press carriage return while entering your text, the system will adjust the text for the final report.
-
Select a Conversion format, typically html.
-
Do one of the following:
-
To burn the report to a CD, place a CD-R in the system CD/DVD drive, click Create CD, and OK to start the writing process.
-
A message displays while the CD is written.
-
When the CD writing step is completed, the CD ejects from the drive. Click OK to the CD Written Successful prompt.
-
-
Click Send FTP to send the data to an IP address. Complete all the fields on the FTP window and click OK
-
Click OK to the Successful File transfer prompt.
-
The media is removed from the drive.
-
-
Click Quit to exit Data Export.
7 View a Report on a PC or Laptop
-
Place the CDROM in the CD drive of a PC or laptop running Windows 2000 or XP.
-
The CD launches automatically. If it does automatically start, open the CD by clicking on your My Computer icon and open your CD drive. Click INDEX to open the file.
-
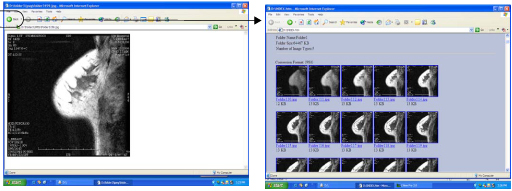
The report is opened and displayed from an Internet Browser. See Figure 6.
Figure 6. Sample Report
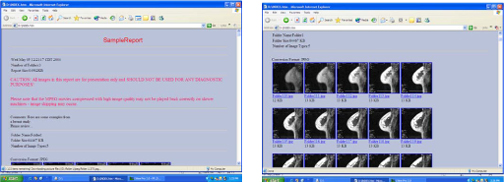
Place the cursor over an image and left-click to magnify the image, see Figure 7. Click the Back arrow on your internet Browser menu bar to return to the report.
Figure 7. Magnified Image
-
When finished viewing the report, close your internet browser by clicking File > Close from the menu bar.
-
Remove the CDROM from the CD drive and store it.